Friday, October 16, 2015

6 Unbreakable Safety Rules for CNC Machinery Safety

Learn what to do, and what not to do, to keep yourself safe when you operate CNC machinery. Computer numerical control (CNC) machines are generally safe. But worker misuse can easily jeopardize their safety. That’s why it’s important for their operators to know exactly what they should – and should not – do.


When your workplace is safe, you’re able to attract the best employees. Worker satisfaction and productivity stay high. Turnover and costs related to workplace accidents stay low. So here’s what to look for to keep your workers safe:
  1. Only Operate CNC Machines You’ve Been Trained to Use
Sounds obvious and simple, but some companies do allow untrained employees to operate CNC machinery with little or no training. Many accidents do happen this way.
  1. Always Have at Least One Person Observing the CNC Machine
For some, it’s tempting to leave the room while the programmed CNC machine does its work. Most likely, nothing will go wrong. But once in a while, CNC machines break or don’t work right. It happens. They’re machines. And that’s when injuries can happen too. So make sure you have every CNC machine under observation by at least one person.
  1. Always Do These Things Before Operating Your CNC Machine
Here’s a brief list of to-dos:
  • Make sure the CNC machine isn’t operating when you load a tool magazine
  • Ensure the tools are sharp and free of cracks
  • Double-check to make sure all tools are set correctly
  • Double-check that you have set the right tool data for the program
  • Test tools before every new use
  • Examine seating surfaces for cleanliness before installing new tools
  • Set the spindle direction correctly for right and left-handed operators
  • Only use tools within manufacturer limits and tighten them to their recommended torque
  1. A Few Things Never to do Before Operation
Pretty simple and straightforward here. Never use blunt, cracked, or chipped tools. If you notice tools with damaged tips, don’t use those either.
  1. If You Use a CNC Router…
Before you operate a CNC router, make sure there aren’t any screws in the path of the bit. At best, the bit will get broken and the screw will get embedded into your project. However, in some cases the screw can shoot off and hit you or another worker. If, during operation, you notice anything unusual with the bit, hit the pause button, or the red emergency button for immediate shutdown. Fix the problem before you begin operating again.
  1. Always Make Sure You’re Mentally Focused
If you’re not feeling well and it’s hard for you to concentrate because of a sickness, don’t use CNC machinery. Supervisors, send your workers home if you notice them behaving unusually. Workers, notify your supervisors if something doesn’t seem right. Better to miss a few hours of work that cause an injury to yourself or someone else. And, better to leave work than it is to break the machine and cause costly repairs and downtime. Do those things – and you and your workers will stay safe.

Friday, July 10, 2015

Let’s Talk Texture: A Guide to EnRoute’s Rapid Texture


Texture

Rapid Texture

The Rapid Texture tool is a design tool that lets you utilize the shape of the tool to create a wide range of interesting surfaces. Rapid Texture can be applied to almost any surface, including simple flat rectangles, relief surfaces, and any shape you can think of. Even though EnRoute has made the process of creating Rapid Texture as simple as a few mouse clicks, they haven’t removed the designer’s part in the process. The design process allows you to be as creative as you want to be with Rapid Texture. The process begins with Seed Contours which are used to create initial offsets. You can then use Relief Surfaces to shape the Rapid Texture contours and make any relief a part of your Rapid Texture design. The Rapid Texture parameters allow you to create the effect you want by adjusting how Rapid Texture contours are created. Lastly, simply select whichever contours you want to use for trimming your Rapid Texture. Do you have a large area that requires several panels? No problem. Any Rapid Texture design can be seamlessly extended over as many panels as you need. Rapid Texture is the latest example of how the EnRoute team is always working to provide you with interesting and capable tools that will keep your creative juices flowing and give you new ways to make the most of your machine.

Parametric Texture

There are a number of ways to create textures in EnRoute. One of the methods offers unlimited possibilities – this is called Parametric Textures. Parametric Textures are created by mathematical equations and go in all directions infinitely. In as little time as five mouse-clicks, you can add a vector-based 3D texture that you can resize on-the-fly and toolpath. Whether you wish to create backgrounds for signs or add textures to cabinets, wall panels, or even furniture, look no further than EnRoute since the design possibilities are endless!

What’s New With EnRoute

EnRoute continues to add new features and make improvements to its Rapid Texture tool. In what’s being called its most powerful software ever, EnRoute has included the following features in EnRoute 5:

Resolution and Tolerance

Two new parameters were added to let the user define the resolution of the noise pattern and a cleanup tolerance for the Rapid Texture contours. These two parameters used to be built in to the tool, which created limitations for small and very large designs.

Fade Function

EnRoute introduced a new Fade parameter to Rapid Texture that lets you define a distance over which to fade out the noise texture applied to the RT offsets. This gives you another way to make your RT designs creative and unique.

Thursday, May 21, 2015

Difference Between HSK Toolholders and Standard Toolholders

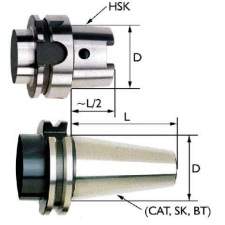
HSK toolholder vs. CAT toolholder
MultiCam is continually striving to offer the latest technological advances in CNC cutting technology. But we recognize that sometimes there is resistance to change, especially when the advances are not well understand or are as yet not widely adopted. We are often asked why we offer HSK style toolholders on the majority of our systems, rather than the standard toolholders such as CAT, SK and BT. An article written by Dr. Eugene Kocherovsky gives a highly detailed explanation on the benefits of using HSK toolholders rather than the older style.
Despite its growing use and acceptance in the United States, HSK technology remains widely misunderstood. Questions about its proper use have created substantial resistance among those who are accustomed to traditional, steep-taper shanks, including CAT, SK and BT. Although a significant portion of the machine tools imported to the United States from Europe incorporate HSK spindles, steep-taper shanks still represent the most widely used tooling interface.
The acronym “HSK” is the German abbreviation for “hollow taper shank.” An HSK shank has a ratio of 1:10, compared to CAT (BT, SK) shanks that have ratios of 7:24. HSK shanks must be connected to machines via compatible HSK spindle receivers. Whereas steep-taper shanks were developed prior to standardization, HSK shanks were developed to address performance problems associated with the traditional interfaces, particularly in high speed machining applications.
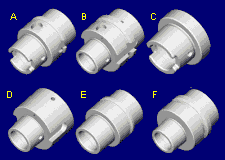
6 types of HSK toolholdersThe preliminary HSP standards included six types of HSK shanks designated as A through F and a total of 35 sizes. HSK shanks address three different application categories. Types E and F are designed for low torque and very high spindle speeds on machines that incorporate ATCs. Types A and C serve applications requiring moderate torque and moderate-to-high spindle speeds. (Type A is for automatic tool changing, and Type C is for manual changing.) Types B and D are designed for high torque applications with moderate-to-high spindle speeds. (Type B is for automatic changing and Type D is for manual changing.)

Differences between HSK and Steep Taper

High clamping force and radial stiffness

The first category of comparison is radial and axial stiffness- the most important aspects of any machining operation. Unlike conventional shanks, an HSK shank is hollow and the clamping mechanism operates from the inside (Figure 3, at right). The end of a typical, HSK Type A shank incorporates two drive slots that engage milled drive keys in the spindle receiver. The wall of the hollow shank deflects slightly when it’s clamped into the receiver. Radial access holes in the shank’s wall allow the clamping mechanism to contact an actuation screw. The inner surface of the shank wall also incorporates a chamfer to facilitate clamping.
Although different clamping methods are available depending on the tooling manufacturer, all HSK receivers incorporate segmented collets that expand radially under drawbar pressure to bear against the inner wall of the shank. Because the collet’s chamfer matches the chamfer of the shank’s inner wall, the shank is locked securely into the receiver when the drawbar is actuated. When this occurs, elastic deformation of the shank’s walls creates firm metal-to-metal contact around the shank, as well as mating the shank’s flange with the receiver.
Assuming that equivalent force is applied to the drawbar, twice as much clamping force is exerted on the flange of an HSK shank compared to a steep-taper shank. This extra clamping force makes the radial stiffness of HSK toolholders up to five times greater than the value for CAT, SK or BT. This makes the tool more resistant to bending loads, thus allowing deeper cuts and higher feedrates in milling and boring operations. Higher rigidity also translates to a higher natural frequency for the cutting system. This allows a tool to be operated at higher speeds before resonance or “chatter” commences. Because tool deflection is reduced, machining accuracy and surface finish also improve.

Easier tool changing

The HSK interface also offers some key advantages in relation to high speed machine spindles, tool collisions and maintenance. Using a conventional interface (CAT, SK, BT) at spindle speeds greater than 8,000 rpm, the spindle receiver expands at a much higher rate than the toolholder shank. This causes the shank to be pulled back axially into the spindle under the force of the drawbar. This changes the Z-axis position of the tool tip and often locks up the toolholder inside the receiver, thus making tool-changing difficult. Conversely, the design of the HSK connection prevents the shank from pulling back into the receiver during high speed operation.
Because of the short length of the HSK taper (approximately one-half the length of a CAT shank) and the lighter weight of its hollow shank, tool changes can be completed more rapidly than is true with conventional toolholders. Part of this time savings results from the fact that the HSK interface does not require a retention knob to clamp the shank.

Prevents damage to spindle during tool crashes

When a tool collision occurs using a conventional, steep-taper shank, the potential damage can be considerably greater than is true when using an HSK shank. Because a CAT (SK, BT) shank is solid steel, most of the collision load (and damage) transfers to the spindle. With its hollow design, however, the HSK shank acts as a fuse during collisions. When a cutting tool crashes, the toolholder breaks off and protects the spindle, thus reducing repair costs and machine downtime.

Can withstand variable cutting conditions

Variable cutting conditions can adversely affect the CAT (SK,BT) interface. This applies particularly to modern CNC machining centers that are used in flexible manufacturing systems. Under these circumstances, machines may operate at low speed and high torque, as well as high speed and low torque. Because conventional toolholders are clamped from the outside, centrifugal force causes the spindle walls to expand faster in relation to the shank at spindle speeds higher than 8,000 rpm. Consequently, the draw bar force pulls the shank deeper into its receiver, changing the position of the tool tip and frequently locking up the tool.
The HSK interface is not subject to this problem because of firm contact between mating components. This contact is enhanced at high speeds because, as the collet segments in the receiver rotate inside the hollow shank, centrifugal force increases the clamping force.

At MultiCam, the 32 and 63 HSK toolholders are our most popular, fitted on our high performance routers. To purchase these, or any of our toolholders, please visit: store.multicam.com

Tuesday, April 21, 2015

Greasing Your CNC Cutting System

We’re always talking about how to maximize the longevity of your CNC machine and consumables. Proper and timely maintenance is of course the easiest way to ensure you’re getting the biggest bang for your buck. Just as you would change the oil in your car or use WD40 on a squeaky door, adding grease to your CNC machine ensures it runs smoothly.

We recommend re-greasing your machine every month. There are 3 main areas for greasing: the bearing cars, the racks, and the ball screw (in most CNC models).

Bearing cars

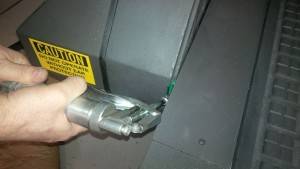
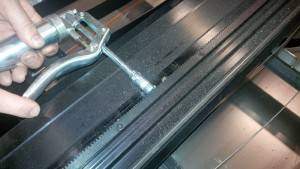
Bearing cars can be found on either side of the x-axis gantry, y-axis, and z-axis. Using your grease gun, position the tip directly over the small ball inside the bearing car. Make sure you are compressing the ball. For a properly primed grease gun about 3 squeezes should do it. Wipe off any excess grease and repeat for all bearings.Greasing the bearing cars
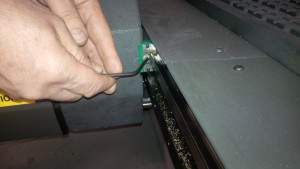
On some older CNC machines the ball will not be directly accessible for the grease gun. Use the smaller attachable tips to compress the ball, and squeeze the grease inside.
Smaller attachment on grease gun

Racks

A light coat of grease is recommended for all of the racks. Lightly squeeze your grease gun as you move along the racks. Then use you finger to ensure the grease has gotten inside the teeth of the racks, as well as removing any excess grease. Remember only  a light coating of grease is needed; too much will just cause a mess and trap dirt and debris.Greasing the racks

 Ball-Screw

On most MultiCam models, a ball screw is used to move the Z-axis up and down. Same as the racks, use just a small amount of grease around the screw. Usually just using your finger is sufficient. Again, if you use too much grease you will be trapping too much dirt, which can be especially problematic around the ball-screw. You don’t want chips or debris flowing down the ball-screw as this can damage the ball nut. For our V-Series models, there isn’t a ball-screw. Instead there is another rack and pinion so you can follow the instructions above.

After 6 months we recommend a complete grease clean-up. Using a de-greasing agent, de-grease all bearing cars and racks, and then re-grease them. Why go through all this trouble? Grease is a lubricant but it also traps dirt and debris, which can eventually lead to build ups. Too often we get calls from customers about poor cut quality or cut chatter and the reason stemmed from a build-up of dirt. Save yourself a potentially expensive service call by instituting a semi-annual clean-up.
For the ball-screws however, do not use a de-greasing agent. Instead use another lubricant, like a torch lubricant in a plasma system. Lubricate the ball screw and then wipe everything clean with water, then re-apply the grease. We say this because it’s extremely important that chips and debris do not travel down into the ball nut. A de-greasing agent can do it’s job too well and debris will slip down into the ball nut. Dirt in the ball nut can cause binding which eventually results in a motor fault. If debris is stuck in the ball nut, the motor needs to work harder to move the Z-axis, drawing too much amperage, thus causing a fault.
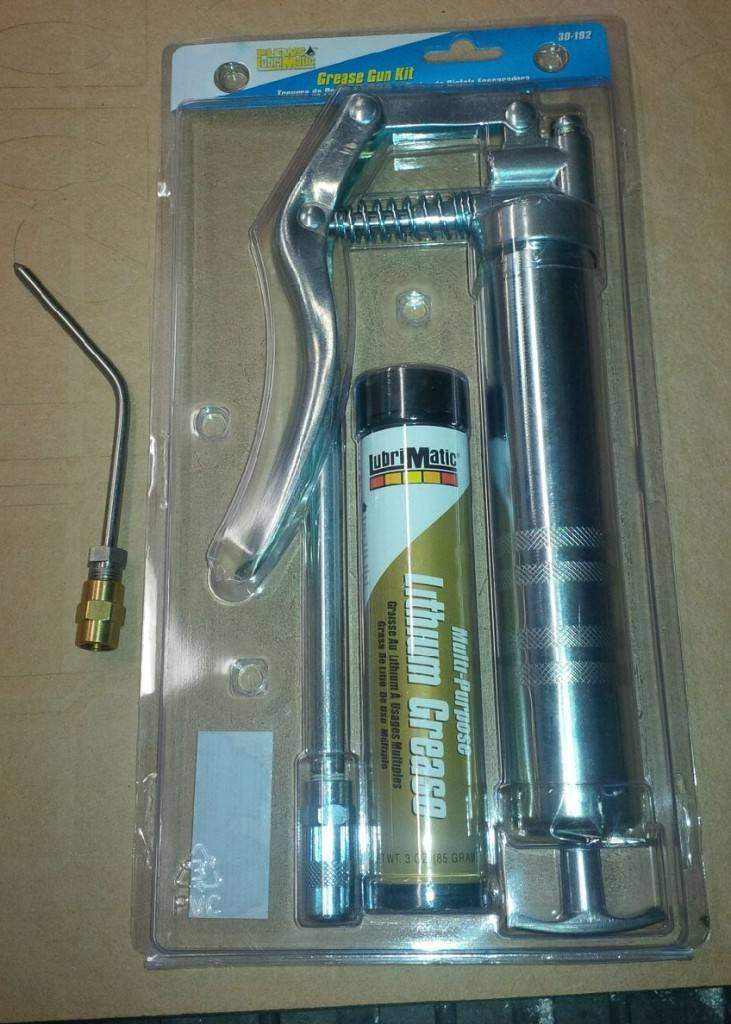
We sell grease cartridge packages and grease guns. Just visit store.multicam.com and order yours today! Save yourself the hassle and expense of machine down time by just sticking to a proper greasing maintenance schedule.
Grease and grease gun pack

Thursday, April 2, 2015

Pro-Tip: MDF Spoilboards

We talk a lot of about spoilboards and sacrificial material, yet we still have customers encountering problems. Lately, we’ve had an increased number of customers call in about a lack of suction on their tables. There are a number of reasons why this could be happening. Perhaps the vacuum pump isn’t working correctly or the fittings aren’t secure. And yet the most common reason why a customer is experiencing a lack of suction? Their spoilboard.
We get that materials can be expensive and that picking up a piece of MDF at the lumber yard (or a piece that’s been lying around in your shop) is an inexpensive means of having a spoilboard. However, if you choose to use MDF you must TABLE MILL BOTH SIDES OF THE BOARD. This cannot be emphasized enough. MDF is created with a sealant, and this sealant prevents air from flowing properly through the board. If you do not route both sides of the board, air cannot pass through, and thus there will be a lack of suction on the piece you’d like to cut.
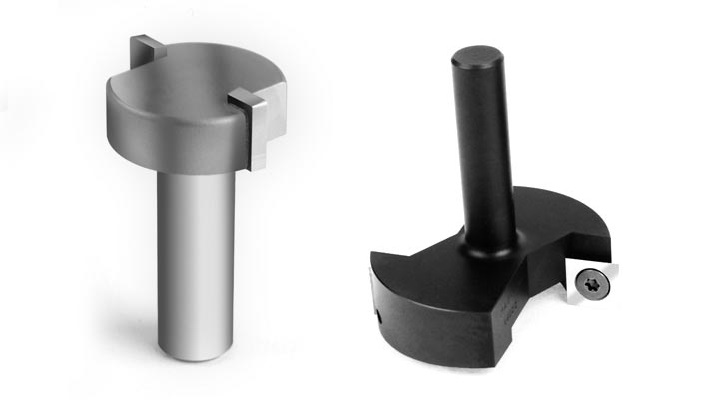
To create an MDF spoilboard, use a bit such as Onsrud’s 91-000 CT Spoilboard Cutter. If you’d like to use a material that doesn’t require the milling first, we recommend using LDF. LDF does not have the sealant that MDF has and its lower density means that air can more readily pass through, thus increasing your suction.
Onsrud 91-000 for MDF milling
So before you’re frantically calling your CNC support technician think, could the suction have anything to do with my spoilboard? By ensuring you’re using the correct spoilboard, you could save time, money on service calls, and headaches.

Monday, March 16, 2015

How to Increase Spindle Life

SpindlePM
Here is an excellent article by Lindsay Luminoso from the Canadian MetalWorking Magazine, offering expert advice on how to extend spindle life.
“Out of sight, out of mind.” When it comes to spindle maintenance, this adage is more common than not. However, when manufacturers take this approach, they can often find themselves with spindle failures that can be both costly to repair and cause downtime and lags in production.
Overlooking this critical component can spell disaster and affect the bottom line. When you purchase a car, you don’t simply drive it without understanding the specific features and needs of the vehicle. Why would you do the same with your CNC machine and its spindle? Many operators will turn on the machine and run it without really understanding the capabilities and limitations of the spindle. Adding small checks and scheduling preventive maintenance can ensure long spindle life and increase productivity.
The spindle really is the heart of the machine and is designed with the application and user specifications in mind. Regardless of what type of machine you are running, the spindle allows the machine to function.
“Typically, when someone purchases say for example, a large milling centre, the spindle is so buried, but it’s the heart of the machine. You can build the most rigid machine in the world but you have to have a good spindle motor in there,” says Gary Quirion, corporate president of GMN USA.
Because the spindle is often hidden, it is sometimes forgotten about when the operator does machine checks and worse, can be unknowingly pushed beyond capabilities.
This is why it is so important to understand the features and specification of this critical component. The onus is on the owners and operators to keep their spindles in good working condition in order to maintain longevity. End-users need an education on the [specifications] of the machine. It’s not just plug-and-play for all its life,” explains Alexandre Maurais, president of MEC PRECISION. Maintaining proper machining practices and inspection of parts can mean the difference between a seized spindle and a spindle that lasts.
“The spindle life can be infinite, but only if it doesn’t crash,” says Gus Gustafson, service manager for Thomas Skinner & Son Ltd. Crashes occur when the operator pushes the machine to do something that it isn’t normally supposed to do; this can cause the spindle to stall and halt operations.
Unfortunately, this is a common occurrence on the shop floor. The spindle life really depends on how the operator treats it and how they run the machine. “The spindle life really varies. They can last 10-15 years under normal use. But if someone crashes it on a regular basis, it could last only a year or less,” continues Gustafson.
SIGNS OF A PROBLEM
There are some clear indicators that your machine’s spindle is in need of inspection or repair. Obviously, if the machine is no longer rotating, this could mean that the spindle has failed. The spindle itself is a highly sensitive component with many intricate parts. Rotating parts like the chucks, drawbars, quills, rotors, shafts, etc., should be handled with care to ensure that they are never hit and jarred, which can cause serious damage to the overall spindle abilities. Tolerances for the rotating parts are so tight that even the smallest push can cause failure. However, a spindle may not stall entirely, but there are some factors that can point to a future spindle failure. “Old school, if it’s noisy, or if you have part finish issues, or the spindle is running hot, those are good indicators,” says Quirion.
The experts agree that uncharacteristic noise is one of the key signs that there is a problem. Monitoring the spindle from the install and confirming that there are no abnormal or different noises is one way to keep the spindle spinning, say Maurais.
Cracking, humming or banging noises should be a clear indication for the operator to contact the maintenance department or spindle repair service to diagnose the problem.
A part finish can easily determine a problem with the spindle. Oftentimes, you can clearly see if a part has too much or too little material removed, or the workpiece finish is not correct. Slight variances in the tolerances can cause a part to fail inspection, and if several parts are constantly failing to pass quality inspection, then this can point to a spindle problem. Temperature can also point to a significant problem. When the spindle runs hot, abnormally hot, the operator should stop running the machine before further damage is done. The complex interior components of a spindle can vary significantly depending on the manufacturer or application. However, if the spindle is running above the average temperature, this can be an early indicator of a future problem. There are many ways to measure the temperature, including spindle temperature sensors that are often placed at the top and the bottom of the spindle providing live temperature feedback. Gustafson says that another option for measuring spindle temperature is a heat gun. The operator can measure the temperature themselves and compare against baselines set at that facility.
TIPS FOR OPERATORS
Enhancing spindle life is a fine balance between proper care and proper understanding of this high-precision component. The operator should know the ins and outs of the spindle as well as the machining applications. For example, machining titanium with low speeds and heavy loads can put a lot of stress on a spindle, while light grinding applications and lower speeds can extend spindle life. A typical spindle is designed with the application in mind but the external design is very similar. Internal components, like the angle of the bearings, the number of bearings, the preload, etc., that are developed for each machining application. This is why it is very important to read the manual and specifications for the spindle, especially because the spindle is tucked away in the machine and most operators generally don’t access it.
One of the most important tips Quirion has for extending spindle life is be safe. “I’ve seen many things over the years. I always say read the manual. You’d be surprised how many people call and ask a question, and I ask, ‘Did you see the manual on page such and such?’ and they don’t even have a manual,” he explains.
Speaking to the spindle manufacturer before operation can ensure proper use of the spindle. The manufacturer can provide guidelines that you might not even be aware of. One of the first things the operator can do is run a spindle warm-up program every shift, says Gustafson. As previously mentioned, increased temperature is an indicator of spindle issues. Measuring the temperature the spindle runs at after the warm up cycle is important for establishing a baseline.
Once the baseline is set, the operator can determine normal function of the spindle. If it is running hot, “then you know it is pointing towards a problem,” he explains.
Checking the cooling system to make sure it’s functional is also important. Whether the spindle is cooled through compressed air, liquid, or fan, it is important to make sure that the cooling mechanisms are running smoothly. In most cases, grinding and milling spindles will be liquid cooled. If you are able, it is always a good idea to observe the temperature of the bearings on the front housing. Maurais also points out that there are quite a few spindles that have a positive pressure around the nose. “There is air that is blown all the time so the coolant doesn’t go near the spindle or bearings. The air will stop blowing if the airline is dirty or cracked. [This] will contaminate the bearings quickly and the spindle won’t last long. We are telling customers to watch [out for this]. Make sure there is pressure of air around the bearings at the spindle nose,” he continues.
Experts agree that you must use caution when working with longer tools, as they may alter the rotor dynamics if not careful. For example, Quirion explains, “a spindle might run 60,000 rpm as advertised, but if a long grinding quill is put in it, the speed will be limited. And if the [operator] exceeds that, twofold, you will damage the spindle, and it’s a safety factor and someone can be injured.”
Ensuring that you are using the proper toolholder and appropriate concentricity of the taper to meet the manufacturer’s specifications is key. The toolholder’s tapered shank must fit perfectly in the spindle taper every time it is inserted. “There should be 100 per cent surface contact of the toolholder,” explains Maurais. This will keep the tool on the centre line of the spindle and allow for accurate and proper use.
Examining the contact surface of the taper can also be helpful. You want the contact to be at 100 per cent. Cleaning the toolholders and spindle can help maintain precision and prolong the life of the spindle and ancillary tools. Chips and coolant can often get caught between the tool and the taper interface, damaging both the spindle and the tool holder. Spindle cleaners are quality control products that can be used regularly to remove residual particles that can affect machining capabilities.
Another way to prevent a spindle failure is by making sure the load on the controller is normal. In many cases, the spindle load condition can be defined for particular tools, whereby the machine stops if it reaches this limit. However, verifying the proper settings ensures that an overload won’t occur.
As mentioned, machining something like titanium with heavy loads can put a lot of stress on a spindle. Make sure the spindle is qualified to perform such operations.Spindle Preventive Maintenance
Proper care is really dictated by the type of spindle and application. For an oil-air system you have to make sure that all the settings are adjusted. Quirion explains, “You have to adjust the air and the oil flow rate. The drive unit has to be correct, the tool clamping for automatic tool change spindles have to be monitored, the tool retention should be checked and all the operating parameters with tool/without tool, those safeties should be checked.”
Day-to-day care can mean all the difference when it comes to spindle life. The operator should be aware of the spindle specifications and run the machine accordingly.
SCHEDULING PREVENTIVE MAINTENANCE
Aside from operator control, manufacturers can schedule Preventive Maintenance appointments with expert technicians who can come into the facility and run diagnostics on the spindles, providing data to allow for trending and extend general lifespan of the parts and spindle.
Experts agree that setting a Preventive Maintenance schedule at 3-, 6-, or 12-month intervals, can ensure spindle longevity.
There are many diagnostic tests that should be conducted on a regular basis. Having a thorough history or trending the machine and spindle function allows for manufacturers to plan ahead when it comes to a rebuild.
With Preventive Maintenance, “what we can do is tell you that ‘hey, your spindle probably has about six months left in it before it’s going to fail.’ And we can order the part and change it out for a customer before it even fails,” explains Gustafson. This allows for machine owners to anticipate future failures, which can be extremely costly, especially when it comes to unexpected breakdowns. Not all spindle manufacturers have all parts on the shelf and with new models, parts are not always readily available.
Preventive Maintenance tests can give a good indication when the spindle will need to be rebuilt, so parts can be pre-ordered, without expensive next-day delivery charges and production lags due to shipping times.
“The customers have a machine that cannot be down, cannot be in breakdown situations. The more we are able to prevent that, the more money everyone will make and the less emergency situations everyone will go through,” says Maurais.
There are 4-5 general Preventive Maintenance tests, including vibration test, checking the bearings, testing the pull force of the drawbar, and temperature checks.
Understanding how the spindle functions in the machine and the appropriate machining applications for the spindle can make all the difference when it comes to spindle longevity. Scheduling Preventive Maintenance appointments partnered with proper day-to-day operating techniques can ensure the spindle keeps on spinning for as long as you need.

Friday, February 6, 2015

EnRoute Workshop Schedule for 2015

EnRoute Workshop Schedule for 2015
To help with your carving and engraving needs, get more hands-on with EnRoute CNC router software and learn more about utilizing this program from SA International in special two-day workshops that will be conducted throughout this year at various locations:
• March 5-6: Phoenix, Arizona @ MultiCam Technology Center
• March 19-20: Atlanta, Georgia @ Madera Arts
• April 16-17: Dallas, Texas @ MultiCam Technology Center
• May 14-15: Chicago/Great Lakes @ MultiCam Technology Center
• September 16-18: Denver, Colorado ***VIP Event*** (Meet the EnRoute developers at this special 3 Day “EnRoute Pro” event. This will be a more advanced, three-day class focused on 3D surfacing, carving and texture creation specifically for the sign and woodworking industries.)
• October 8-9: Hackensack, New Jersey @ MultiCam Technology Center
• December 3-4: Anaheim, California @ MultiCam Technlogy Center
“The EnRoute workshop was worth every cent. The instructors patiently relayed, in detail, every aspect of EnRoute’s 2.5D, 3D, Rapid Texture techniques and the many other functions of Enroute,” says New York/New Jersey workshop attendee Henry. I am now able to take advantage of the tremendous features provided in the software.”
Bring your own computer and follow along on your PC with a demo version of EnRoute the workshop will provide. No key required. Here is the two-day class schedule:
Day 1, 8:30am - 5pm
Morning – It Never Hurts to Know the Basics
• EnRoute Concepts Review
• Toolpath Basics
• Nesting
• Output & Ordering
Afternoon – Advanced Toolpathing / Cutting
• Inlays
• 2-1/2 D
• Rough, Fine & Clean Tools
• Advanced Entry/Exit
• Day 1 Wrap-up and prepare for Day 2
Day 2, 8:30am - 5pm
Morning – Now for some Fun Surfaces
• 3D Surface Concepts
• Building a Relief
• Parametric Textures
Afternoon – EnRoute Rapid Texture
• Seed Contour, Objects as Seed Contours & 3D Reliefs with Rapid Texture
• Rapid Picture (Photo Cutting)
• Noise and Distortion
• Day 2 Wrap-up and Q & A
Space is limited, so register early to guarantee your seat. It’s $995 to attend a 2-day class or $1,295 to attend the EnRoute Pro 3-day class, but you save $200 when you register 30 days before the event. Attendees from 2014 save $300 when you register 30 days before the class.
To register, contact Terri Wright at 800/229-9066, ext. 114, or EnRouteSales@ThinkSAi.com.
For more machine and software training courses visit www.multicam.com/training.html

Friday, January 16, 2015

Realizable Capacity - How to get the most out of what you already have.

efficiency2
Original Author: Dick Kallage
Originally posted in Digital FABRICATOR, January 2015                                                                                                                                      
In his informative article The Capacity dilemma – Why today’s churning markets require a new viewpoint about capacity Mr. Kallage outlines an effective strategy to overcome capacity issues in the slow growth, churning market we are currently experiencing. We will bring you up to speed on the main points of the article, deliver Mr. Kallage’s solution and conclude with why we believe that MultiCam CNC machines naturally support the practical lean methodologies recommended in this article.
To begin Mr. Kallage discusses the characteristics of a churning market, which he defines as ‘one in which customers are restless, demanding more on service and pricing to offset the lack of revenue growth, and are willing to churn the supply base – change suppliers – to get what they want.’ This is an important concept to keep in mind, especially when considering capacity planning decisions.
When performing capacity planning it is critical to take into consideration the state of the market. Depending on whether we are in a slow growth churning market or one with steady growth, our capacity planning decisions can have very different consequences. Generally there will be some degree of error in any forecast, so we must decide if we want to set up our capacity so that it will be slightly greater than or less than what will be required to meet actual demand.
If we choose to play it safe and plan to have excess capacity then this will detract from our profits. On the other hand if we opt for having slightly less capacity than may be required, then the time it takes to meet customer orders will increase and our customers may become upset with the longer lead times.
Mr. Kallage says that in normal times with standard growth, businesses tend to gravitate towards having too little capacity. They can pocket the up-front savings from the lower amount invested in capacity and as long as the market isn’t in that slow growth churning state then customers will generally accept the longer lead times. However, given that we are in a churning market, it is very risky to assume customers will be content with this level of service.
Mr. Kallage also emphasizes that if customers do leave to seek suppliers with shorter lead times then it will likely be the major, large order customers, as they are the ones with the most power to obtain improved levels of service. He therefore concludes that in a slow growth churning market it is simply too risky not to choose the excess capacity route, also described as having a capacity buffer.
This brings us to the crux of the capacity dilemma. Do we risk losing key customers due to longer wait times because we opted for too little capacity? Or do we choose to go with excess capacity which could impede profits but would ensure customer satisfaction. Mr. Kallage says the solution can be found in the difference between realizable and absolute capacity and the utilization of practical lean methodologies to reduce this difference.
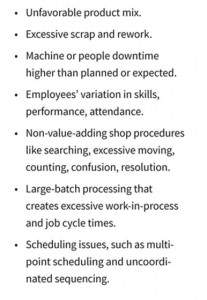
Now there could be a myriad of factors for why a company is operating at a level considerably beneath their absolute capacity potential, but listed below are the key culprits Mr. Kallage identified in the article.
BlogPostList


In order to combat these factors and improve efficiency Mr. Kallage recommends employing lean practices such as; ‘machine uptime monitoring, 5S and the visual workplace and any other practices that increase machine uptime, scheduling discipline, cross-training and information standardization’
If a company can adopt strategies to improve the utilization of the capacity they already have (thus decreasing the deficit between realizable and absolute capacity) then they can avoid having to settle for either of the tradeoffs we discussed above. By improving realizable capacity they can achieve the required capacity buffer (critical to reduce risk in the slow growth, churning market) without having to sacrifice profit margins investing in more capacity.
We believe that MultiCam’s products synergise extremely well with the strategy of adopting lean practices. The end goal of these practices is to improve realizable capacity by eliminating activities that result in unnecessary down time. MultiCam CNC Cutting Solutions inherently facilitate these improvements given the flexible and custom nature of their design. Every one of the MultiCam machines is built to order based on each customer’s unique manufacturing requirements.
One of the key culprits listed above is higher than expected machine or people downtime. Unlike some companies that simply assemble machines after outsourcing parts, MultiCam’s In-House Manufacturing ensures quality control through the manufacturing cycle. MultiCam also has more than 70 Local Technology Centers worldwide so our team of experts are set up to be in close proximity if a customer does require parts, maintenance or even programming assistance.
Another listed key culprit that could contribute to unnecessary downtime was employees’ variation in skills performance or attendance. MultiCam’s EZ Control system is the elegant solution to this common, yet serious productivity concern. Incorporating state-of-the-art CNC technology, it features an incredibly easy-to-use human-machine interface that allows companies to utilize their existing workforce. The controls hand-held interface eliminates the need for operators to be G-code literate; meaning any shop employee with a few minutes of training can operate a MultiCam machine. Flexibility is essential and not only is EZ Control a common part on all MultiCam machines; many of our standard parts are interchangeable.